Интегральные цепи
This guide will cover the use of the Integrated Circuit Printer, an extremely versatile item that allows production of customized items called assemblies. Assemblies have a wide range of possibilities, limited only by the player's imagination and the size of the assembly. It is possible to produce specialized signalers, intelligent augments for implantation, explosives, medicine dispensers, mobile robotic minions and much more. Some example circuits will be included at the end of this guide.
Creating a new integrated circuit can take some time, and for the more complex types requires a basic knowledge of how logic works in boolean algebra. However they can be easily copied and brought into future rounds. It can represent an interesting puzzle to implement your desired functions within the (quite restrictive) limits of the assembly sizes.
Assemblies can be extremely powerful, make sure to be creative and have fun making your circuits, but remember the Rules and don't stray into powergaming or griefing with circuits.
Tools
Assemblies
There are many types of assemblies, which act as containers for your integrated circuits. Assemblies each have a space (physical internal volume) and a complexity (a cap on the amount of complicated circuits you can include) and some additional features based on the shape of the assembly, (e.g. The one that resembles a PDA can have an ID Card inserted.)
Assemblies fit into four main categories: Assembly, Mechanism, Machine and Drone.
Assembly-class Assemblies are the smallest in space and complexity, but have some features based on their small size. Such as the ability to fit in belt or PDA slots, or inside an augment.
Mechanism-class Assemblies are larger, but cannot fit so easily on your character. They are more suited for assemblies that could sit on a table and perform their function. They have twice the space and complexity of the Assembly-class.
Machine-class Assemblies are the largest and can be affixed to the floor and treated like a piece of furniature. These allow you to build the most complicated integrated circuits. They have four times the space and complexity of the Assembly-class.
Drone-class Assemblies allow you to create robots that can move and interact with the world. They have three times the space and complexity of the Assembly-class.
Additionally, there are two wall-mounted assemblies, which resemble screens that can be attached to a wall. They have twice the space and complexity of the Assembly-class.
As assemblies get larger they also take more steel to create from the printer.
Below is a table that lists each assembly and what special features it has.
| Assembly Name | Description |
|---|---|
| type-a electronic assembly | It's a case, for building small electronics with. |
| type-b electronic assembly | It's a case, for building small electronics with. This one resembles a pocket calculator. |
| type-c electronic assembly | It's a case, for building small electronics with. This one has a clamshell design. |
| type-d electronic assembly | It's a case, for building small electronics with. This one has a simple design. |
| type-e electronic assembly | It's a case, for building small electronics with. This one looks like it has a belt clip. (Can fit in belt slot) |
| type-f electronic assembly | It's a case, for building small electronics with. This one resembles a PDA. (Can fit in ID or belt slot) |
| augment electronic assembly | It's a case, for building small electronics with. This one is designed to go inside a cybernetic augment. (Can shoot firearms, and be implanted using an integrated circuit augment) |
| type-a electronic mechanism | It's a case, for building medium-sized electronics with. |
| type-b electronic mechanism | It's a case, for building medium-sized electronics with. This one has a boxy design. |
| type-c electronic mechanism | It's a case, for building medium-sized electronics with. This one has a clamshell design. |
| type-d electronic mechanism | It's a case, for building medium-sized electronics with. This one resembles some type of medical apparatus. |
| type-e electronic mechanism | It's a case, for building medium-sized electronics with. This one resembles a gun, or some type of tool, if you're feeling optimistic. It can fire guns and throw items while the user is holding it. (Can fire guns, and be anchored to the floor) |
| type-f electronic mechanism | It's a case, for building medium-sized electronics with. This one resembles an old radio. |
| type-a electronic machine | It's a case, for building large electronics with. |
| type-b electronic machine | It's a case, for building large electronics with. This one resembles an oscilloscope. |
| type-c electronic machine | It's a case, for building large electronics with. This one resembles a computer terminal. |
| type-d electronic machine | It's a case, for building large electronics with. This one resembles a robotic arm. |
| type-e electronic machine | It's a case, for building large electronics with. This one has a tall design. |
| type-f electronic machine | It's a case, for building large electronics with. This one resembles some kind of industrial machinery. |
| type-a electronic drone | It's a case, for building mobile electronics with. |
| type-b electronic drone | It's a case, for building mobile electronics with. This one is armed and dangerous. |
| type-c electronic drone | It's a case, for building mobile electronics with. This one resembles a Securitron. |
| type-d electronic drone | It's a case, for building mobile electronics with. This one resembles a Medibot. |
| type-e electronic drone | It's a case, for building mobile electronics with. This one has a generic bot design. |
| type-f electronic drone | It's a case, for building mobile electronics with. This one has a hominoid design. |
| heavy wall-mounted electronic assembly | It's a case, for building large electronics with. It has a magnetized backing to allow it to stick to walls, but you'll still need to wrench the anchoring bolts in place to keep it on. |
| light wall-mounted electronic assembly | It's a case, for building small electronics with. It has a magnetized backing to allow it to stick to walls, but you'll still need to wrench the anchoring bolts in place to keep it on. |
Components
There are many categories of component, below they will be listed along with a brief description of what you can expect from each category.
| Category | Description |
|---|---|
| Power - Passive | Generate power for your integrated circuit. |
| Input | Everything to input information to your circuit, from number/text pads to item sensors to atmospheric analyzers. |
| Output | Display something, through screens, lights, sounds. |
| Arithmetic | Everything you need to perform mathematical operations. |
| Converter | Integrated circuits are type-based, with strings, numbers, references. These components let you convert between them, or otherwise manipulate variables. |
| Data Transfer | A series of multiplexers and demultiplexers of varying sizes. |
| Filter | Lets you filter your variables for specific types, such as only allowing item references through and excluding players. |
| Lists | Construct and manipulate lists. |
| Logic | Contains circuits for boolean logical operations. |
| Manipulation | Circuits to manipulate items, move your assembly, allow AI control or create bluespace portals. |
| Memory | Store variables. |
| Power - Active | Send power from your assembly's battery elsewhere. |
| Reagent | Manipulate liquids within the assembly. |
| Smart | Pathfinding tools for mobile assemblies. |
| Time | Tickers, delays and time circuits. |
| Trig | Trigonometric functions. |
| Assemblies | Contains all the assembly designs mentioned above. |
| Tools | Contains all the tools mentioned above, as well as data cards. |
Circuit Design
Once you have decided on your assembly type, and what you want your circuit to do - It is time to print all the components and insert them into your assembly. Once this is done, use the Circuit Wirer on the open assembly casing to open the assembly internals screen.
Assembly Internals Screen
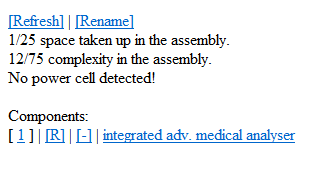
On this screen you will see a list of the current complexity and space, and their maximum, the power cell status, as well as a list of the installed components.
Component Screen
Clicking on any component will bring up that component's settings, wiring and a description of what it does. In this screen you can also rename, copy the reference of or remove that component.
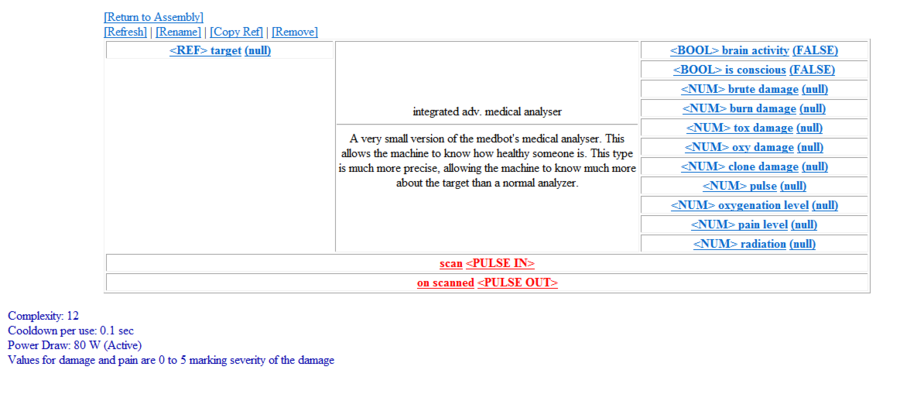
Below we have an example of one of the medical scanner components, which when used on a target will give the assembly information on its health.
On the left side of the screen we see <REF> target (null) - This means we need to provide the circuit with a target reference as an input. Currently we have null or nothing input. Using another component such as a sensor and wiring it to the medical scanner circuit, we can provide it with a reference. Variables are always written in the format <Type> name (current). Types can be Any, REF, String, NUM or BOOL - And you can only connect compatible pins together. If you wish to send the output of a NUM pin to, for example, a screen for display - Then you will have to pass it through a num to string component first to change the type.
In the center we have the pulse pins, these tell the circuit when to trigger and where to send out a pulse when it operates. We might wire the scan pin to a sensor output trigger, so that when we have scanned something and we know that the reference will be passed to the medical scanner, we tell the medical scanner to operate using that reference. Then we could use the output of the medical scanner to trigger another component such as a screen to display the scan.
Connecting Components
Connect the components using the Circuit Wirer. It has two modes, Wire and Unwire, which can be toggled with Z or by clicking on the Wirer. To wire or unwire, click on the two pins you wish to wire/unwire. They must be compatible, i.e. You cannot wire a pulse pin to a variable pin, nor can you connect pins with incompatible types. Pins can have multiple connections.
Occasionally, you will not want to connect a pin to anything - But you will still want it to have a variable. This may be the case with a ticker that you always want to be on, so it requires a <BOOL> True on the input. You can achieve this using the Circuit Debugger. Double-click the Debugger in-hand to open a menu to allow you to select a variable type, select the variable you want and then input the value. Then click on the appropriate pin with the debugger to set the value. An example of this can be seen in the above image, in which pin <NUM> B is permanently set to 7. The debugger can also be used to pulse a trigger pin to allow you to test out your circuit.
Sample Circuits
| Grabber Augment Allows storage of small items within itself. |
|---|
| {"assembly":{"type":"type-d electronic assembly"},"components":[{"type":"grabber","inputs":2,0,1},{"type":"ranged sensor"},{"type":"button","name":"Drop All"},{"type":"memory chip","inputs":1,0,-1},{"type":"memory chip","inputs":1,0,1}],"wires":[[[1,"I",1],[2,"O",1]],[[1,"I",2],[4,"O",1]],[[1,"I",2],[5,"O",1]],[[1,"A",1],[2,"A",1]],[[1,"A",1],[4,"A",2]],[[1,"A",2],[5,"A",1]],[[3,"A",1],[4,"A",1]]]} |
| Wall-based Medical Scanner Scans the person standing in front of it for medical problems. Note that it has delays to allow for logic gate operation without issues. |
|---|
| {"assembly":{"type":"heavy wall-mounted electronic assembly","name":"EZ-MED Scanner 1.0","detail_color":"#e2e2e2"},"components":[{"type":"integrated adv. medical analyser"},{"type":"adjacent locator"},{"type":"button"},{"type":"greater than gate","name":"Greater Than Damage","inputs":[[1,0,0],[2,0,0]]},{"type":"eight multiplexer","name":"Damage Type Name","inputs":[[1,0,8],[2,0,"Brute Damage"],[3,0,"Burn Damage"],[4,0,"Toxin Damage"],[5,0,"Oxygenation Damage"],[6,0,"Genetic Damage"],[7,0,"Pulse Level: 84"],[8,0,"Pain Level"],[9,0,"Radiation Level"]]},{"type":"eight multiplexer","name":"Damage Type Number","inputs":[[1,0,8],[2,0,0],[3,0,0],[4,0,0],[5,0,0],[6,0,0],[7,0,84],[8,0,0],[9,0,0]]},{"type":"addition circuit","name":"Counter Adder","inputs":[[1,0,7],[2,0,1]]},{"type":"modulo circuit","name":"Counter Modulus","inputs":[[1,0,7],[2,0,8]]},{"type":"memory chip","name":"Counter Memory","inputs":1,0,7},{"type":"addition circuit","name":"Multiplex Incrementer","inputs":[[1,0,7],[2,0,1]]},{"type":"small concatenator","name":"Text Adder","inputs":[[1,0,"Pulse Level: 84\n"],[2,0,"Radiation Level"],[3,0,"\n"]]},{"type":"equal gate","name":"Count Finished Check","inputs":[[1,0,8],[2,0,8]]},{"type":"half-sec delay circuit","name":"Screen Update Delay"},{"type":"memory chip","name":"Screen Reset"},{"type":"tenth-sec delay circuit","name":"Equals Delay"},{"type":"tenth-sec delay circuit","name":"Adder Delay"},{"type":"small screen","name":"Output Screen","inputs":1,0,"Pulse Level: 84\n"},{"type":"tesla power relay"},{"type":"tesla power relay"},{"type":"small concatenator","name":"Pulse Concat","inputs":[[1,0,"Pulse Level: "],[2,0,"84"]]},{"type":"number to string","name":"Pulse Num2String","inputs":1,0,84}],"wires":[[[1,"I",1],[2,"O",1]],[[1,"O",3],[6,"I",2]],[[1,"O",4],[6,"I",3]],[[1,"O",5],[6,"I",4]],[[1,"O",6],[6,"I",5]],[[1,"O",7],[6,"I",6]],[[1,"O",8],[6,"I",7]],[[1,"O",8],[21,"I",1]],[[1,"O",10],[6,"I",8]],[[1,"O",11],[6,"I",9]],[[1,"A",1],[2,"A",2]],[[1,"A",2],[7,"A",1]],[[1,"A",2],[21,"A",1]],[[2,"A",1],[3,"A",1]],[[3,"A",1],[14,"A",1]],[[4,"I",1],[6,"O",1]],[[4,"A",1],[6,"A",2]],[[4,"A",2],[11,"A",1]],[[5,"I",1],[10,"O",1]],[[5,"I",7],[20,"O",1]],[[5,"O",1],[11,"I",2]],[[5,"A",1],[10,"A",2]],[[6,"I",1],[10,"O",1]],[[6,"A",1],[10,"A",2]],[[7,"I",1],[9,"O",1]],[[7,"O",1],[8,"I",1]],[[7,"A",1],[16,"A",2]],[[7,"A",2],[8,"A",1]],[[8,"O",1],[9,"I",1]],[[8,"O",1],[10,"I",1]],[[8,"A",2],[10,"A",1]],[[8,"A",2],[9,"A",1]],[[10,"O",1],[12,"I",1]],[[10,"A",2],[15,"A",1]],[[11,"I",1],[11,"O",1]],[[11,"I",1],[14,"O",1]],[[11,"O",1],[17,"I",1]],[[12,"A",1],[15,"A",2]],[[12,"A",2],[13,"A",1]],[[12,"A",3],[16,"A",1]],[[13,"A",2],[17,"A",1]],[[14,"O",1],[17,"I",1]],[[20,"I",2],[21,"O",1]],[[20,"A",1],[21,"A",2]]]} |


