Этой странице требуется перевод
Эта статья содержит непереведенную информацию.
Материалы
| Иконка
|
Название
|
Материалы для создания
|
Инструменты для создания
|
Методика
|

|
Сталь (Steel)
|
1x Гематит,
1x Графен
|
Переработчик руд
|
Сплавление двух минералов в переработчике руд.
|

|
Пласталь (Plasteel)
|
2x Сталь,
1x Платина
|
Переработчик руд
|
Сплавление двух минералов в переработчике руд.
|

|
Карбидо-осмиевая пласталь (Osmium-Carbide Plasteel)
|
5x Пласталь,
3x Осмий
|
Переработчик руд
|
Сплавление двух минералов в переработчике руд.
|

|
Пластик (Plastic)
|
1x Графен
|
Переработчик руд
|
Переплавка в переработчике руд.
|

|
Алюминий (Aluminium)
|
1x Боксит
|
Переработчик руд
|
Переплавка в переработчике руд.
|

|
Стекло (Glass)
|
1x Песок
|
Переработчик руд
|
Переплавка в переработчике руд.
|

|
Боросиликатное стекло (Borosilicate Glass)
|
1x Боракс,
2x Песок
|
Переработчик руд
|
Сплавление двух минералов в переработчике руд.
|

|
Деревянные доски (Wood Planks)
|
Башенный гриб (Towercap)
|
Ботанические лоток, Топорик
|
- Вырастите башенный гриб в ботаническом лотке.
- Срубите выросший башенный гриб топориком.
- Разрубите получившиеся бревна топориком.
|

|
Металлические прутья (2x) (Rods)
|
1xЛюбой металл
|
–
|
Используйте металл и нажмите “4x metal rods”.
|

|
Напольная плитка (4x) (Floor Tiles)
|
1xЛюбой металл
|
–
|
Используйте металл и нажмите “4x floor tiles”.
|

|
Армированное стекло (Reinforced Glass)
|
1x Металлический прут,
1xСтекло
|
–
|
Используйте металлические прутья на стекло.
|
Покрытия
Стены
Glass
| Иконка
|
Название
|
Материалы для создания
|
Методика
|

|
Glass Panel
|
- 1xGlass
 Screwdriver Screwdriver
|
| Создание
|
| Click on the glass sheet, select one directional. Right-click the panel to rotate. Use screwdriver to complete construction. You can also left-click a grille with the glass sheet to place directly on the grille.
|
| Деконструкция
|
- Screwdriver
 Wrench Wrench
|
|

|
Full Glass
|
- 2xGlass
- Screwdriver
|
| Создание
|
| Click on the glass sheet, select full. Use screwdriver to complete construction.
|
| Деконструкция
|
- Screwdriver
- Wrench
|
| Дополнение
|
Use the following sequence to allow the window to be tinted:
 Cable Coil Cable Coil Multitool to set the window's ID (Optional but recommended for areas with different tinting buttons) Multitool to set the window's ID (Optional but recommended for areas with different tinting buttons)
|
|

|
Reinforced Glass Panel
|
- 1xReinforced Glass
- Screwdriver
 Crowbar Crowbar
|
| Деконструкция
|
- Screwdriver
- Crowbar
- Screwdriver
|
|

|
Reinforced Full Glass
|
- 2xReinforced Glass
- Screwdriver
- Crowbar
|
| Деконструкция
|
- Screwdriver
- Crowbar
- Screwdriver
|
| Дополнение
|
Use the following sequence to allow the window to be tinted:
- Cable Coil
- Multitool to set the window's ID (Optional but recommended for areas with different tinting buttons)
|
|
Шлюзы и двери
Настенные устройства
| Иконка
|
Название
|
Материалы для создания
|
Методика
|

|
APC
|
- 2x Steel
 Power cell Power cell- Wrench
- Cable Coil
- Screwdriver
- Crowbar
 Power Control Module Power Control Module
|
| Создание
|
- Use 2xsteel to make an APC frame and use the frame on the wall you want it on.
- Add cable coil to the assembly.
- Add power control module to the assembly.
- Screwdriver the assembly.
- Add power cell to assembly.
- Use crowbar to shut.
- Use an ID card to open the APC and turn the main beaker on.
|
| Деконструкция
|
- Swipe card to unlock APC
- Remove the power cell.
- Screwdriver the assembly.
- Use a crowbar to lift the floorboards in front of the APC.
 Wirecut the assembly. Wirecut the assembly.- Crowbar the assembly to remove the control.
- Use the
 welder to remove the APC from the wall. welder to remove the APC from the wall.
- (Optional) Wrench the frame to remove it.
|
|

|
Air Alarm
|
- 2xSteel
- Cable Coil
- Screwdriver
- Air Alarm Electronics
|
| Создание
|
- Use 2xsteel to make an air alarm frame and use the frame on the wall you want it on.
- Insert the air alarm electronics to the assembly.
- Use cable coil to wire the assembly.
- Screwdriver to complete.
|
| Деконструкция
|
- Screwdriver to pen the cover.
- Wirecut the assembly.
- Crowbar to pry out the circuit.
- Wrench to remove the air alarm from the wall.
|
|

|
Fire Alarm
|
- 2xSteel
- Cable Coil
- Screwdriver
- Fire Alarm Electronics
|
| Создание
|
- Use 2xsteel to make an air alarm frame and use the frame on the wall you want it on.
- Insert the fire alarm electronics to the assembly.
- Use cable coil to wire the assembly.
- Screwdriver to complete.
|
| Деконструкция
|
- Screwdriver to pen the cover.
- Wirecut the assembly.
- Crowbar to pry out the circuit.
- Wrench to remove the air alarm from the wall.
|
|

|
Light Fixture
|
- 2xSteel
- Cable Coil
- Screwdriver
|
| Создание
|
- Usesteel to make a light fixture frame or small light fixture frame and use the frame on the wall you want it on.
- Use cable coil to wire the assembly.
- Screwdriver to complete.
- Add a light tube for large frame or a lightbulb for small frame.
|
|

|
Security Camera
|
- Camera Assembly
- Cable Coil
- Screwdriver
- Wrench
- Welding Tool
|
| Создание
|
- Drop the camera assembly in front of the wall you would like it to be.
- Wrench the camera assembly.
- Weld the camera into place.
- Cable coil to add the wiring.
- (Optional) Add any additional upgrades.
- Screwdriver to complete and set networks / direction.
|
|

|
Wall-Mounted Sign
|
- Screwdriver
|
Use screwdriver to place on wall or remove.
|
Разное
| Иконка
|
Название
|
Материалы для создания
|
Методика
|

|
Non-Modular Computer
|
- 5xSteel
- 2xGlass
- Cable Coil
- Wrench
- Screwdriver
- Circuitboard
|
| Создание
|
- Use 5xsteel to create the computer frame.
- Wrench in place.
- Insert computer circuitboard of your choice.
- Use the screwdriver on assembly.
- Insert cable coil to assembly.
- Insertglass to assembly.
- Screwdriver to complete the construction.
|
| Деконструкция
|
- Screwdriver to detach the screen.
- Crowbar to pry off the screen.
- Wirecutters to cut the cables.
- Screwdriver to detach the circuit lid.
- Crowbar to pry out the circuit.
- Wrench to detach the frame.
- Welder to disassemble the frame.
|
|

|
Modular Computer
|
- 20x/15x/10x/5xSteel
- Components
|
| Создание
|
- Use thesteel and create the modular computer frame.
- Consoles require 20 steel.
- Telescreens require 15 steel.
- Laptops require 10 steel.
- Tablets require 5 steel.
- Add the required components. These can be found in Tech Storage, printed from the Protolathe, or yanked out of existing computers.
- Processing Module
- Hard Disk
- Tesla Relay or Device Power Cell
- (Recommended) Networking Card
- (Optional) RFID Scanner, Nano Printer, etc.
See Guide to Computing for more details on computer parts.
|
| Деконструкция
|
- Screwdriver repeatedly to remove all the components.
- Wrench to dismantle the computer frame.
|
|

|
Turrets
|
- 7xSteel
- Screwdriver
- Welding Tool
- Wrench
 Proximity Sensor Proximity Sensor Energy Weapon Energy Weapon
|
| Создание
|
- Use 5xsteel to create the turret frame.
- Wrench in place.
- Use 1xsteel on the assembly to add a cover.
- Wrench on the cover to secure.
- Add an energy weapon to the assembly.
- Add a proximity sensor.
- Screwdriver to secure.
- Add 1xsteel to the frame.
- Weld to complete the construction.
|
|

|
Disposal Pipes and Machinery
|
- Disposal Dispenser
- Crowbar
- Welding Tool
- Wrench
|
| Создание
|
- Print the pipe or machinery from the disposal dispenser.
- Crowbar any floor tiles that may be in the way.
- Move pipe onto plating - you can rotate the pipe using right-click. Wrench into place.
- Weld to complete.
|
| Деконструкция
|
To deconstruct pipes:
- Welder
- Wrench
To deconstruct machines, use a screwdriver.
|
|

|
Basic Machines
|
- 5xSteel
- 5x Cable Coil
- Circuitboard (Machine Specific)
- Various extra components (Machine Specific)
- Wrench
- Screwdriver
|
| Создание
|
- Use 5xsteel to create a machine frame (NOTE: the resultant machine will face the direction you face during this step.)
- Wrench the machine frame into place.
- Use the cable coil to prepare the machine frame for electronics.
- Insert the machine circuitboard for your desired machine.
- Screwdriver the machine together.
- Insert all required components. (You can now see these by examining the machine.)
- RECOMMENDED: Insert a Console Screen, and a Input Controller
- Screwdriver the access cover closed.
|
| Деконструкция
|
- Screwdriver to open the maintenance cover.
- Crowbar out the electronics.
- Wrench to dismantle the computer frame.
- Wirecutter to cut the wiring.
- Welder to deconstruct the machine frame.
|
|

|
Rack
|
- 1xSteel
|
| Construction
|
| Use the steel and create a rack.
|
|

|
Table
|
- 1xSteel
- 1x Any stacked material
|
| Создание
|
Use steel in-hand to create a table frame.
- Click the desired table material (wood, metal, etc.) onto the table frame to complete it.
- To make a reinforced table (optional), drag-drop material onto the completed table.
|
| Деконструкция
|
| Use a wrench on harm intent to remove the covering material, then again to dismantle the frame.
|
|
Самодельное вооружение
| Иконка
|
Название
|
Материалы для создания
|
Методика
|

|
Butterfly Knife
|
- 4xPlasteel
- 6xMetal (any)
|
- Use 4xplasteel to construct a concealed knife grip.
- Use the chosen material to construct the knife blade, and attach it to the grip.
- Use a screwdriver to complete.
|

|
Claymore
|
- 10xMetal (any)
- Cable Coil
- 1x Rod
|
- Use 10xmetal to construct a large blade.
- Use the cable coil to create cable cuffs.
- Attach the cable cuffs to the blade.
- Attach the rod to finish.
|

|
Coilgun
|
- 5x Any Rigid Material (Metal, Wood, etc.)
- 5xSteel
 Tape (Duct Tape, Department Tape) OR Cable Coil Tape (Duct Tape, Department Tape) OR Cable Coil Pipe (from Pipe Dispenser) OR Pipe (from Pipe Dispenser) OR  Makeshift Barrel Makeshift Barrel- Welding Tool
- Cable Coil
- 2x Superconductive Magnetic Coil (any kind)
 Rail Assembly Rail Assembly- Screwdriver
- Powercell
- Capacitor (any kind)
|
- Use rigid material to construct a weapon frame.
- Attach thesteel sheets.
- Use tape or cable coil to secure.
- Attach pipe or makeshift barrel.
- Welding tool to secure.
- Wire the components with cable coil.
- Attach the superconductive magnetic coils.
- Attach the rail assembly.
- Screwdriver the assembly to finish.
- Insert powercell and capacitor in order to power the coilgun.Takes metal rods as ammunition.
|

|
Improvised Explosive Device
|
- Drink Can
- Welding Tool
- Cable Coil
- Welder Tank
|
- Use the welding tool on the can.
- Attach cable coil.
- Attach welder tank.Acts like a weak grenade with a randomized timer.
Can be improved by adding up to 10 shrapnel items to the finished IED, including: ammo casings, coins, shards, syringes, pens, and kitchen utensils.
|

|
Makeshift Armor
|
|
- Use thesteel sheets on one of the rail assemblies.
- Attach the other rail assembly.Serves as basic armor. Highly conductive of electricity – watch out for shocks.
|
|
|
Makeshift Barrel
|
- 2 Drink Cans
- Welding Tool
|
- Use the welding tool on the first can.
- Use the second can on the first can to attach.
- Welding tool to finish.Used in the construction of other makeshift weaponry.
|

|
Makeshift Spear
|
- 1x Rod
- Cable Coil
- Glass Shard OR Knife Blade (create with construction - various materials e.g. Plasteel, Steel)
|
- Use the cable coil to create cable cuffs.
- Click the cable cuffs with the rod.
- Attach the glass shard/knife blade to the cable on the rod.
|

|
Pneumatic Cannon
|
- 15xSteel
- Pipe (from Pipe Dispenser) OR Makeshift Barrel
- Welding Tool
- Tank Transfer Valve
- Air Tank (any kind)
|
- Use 10xsteel to construct a cannon frame.
- Attach pipe or makeshift barrel.
- Welding tool.
- Attach 5xsteel.
- Welding tool.
- Attach tank transfer valve.
- Welding tool.
- Insert air tank in order to power the cannon.Can launch any medium or smaller object.
|

|
Powered Crossbow
|
- 5x Any Rigid Material (Metal, Wood, etc.)
- 1xSteel
- 3x Rods
- Welding Tool
- Cable Coil
- 3xPlastic
- Screwdriver
- Powercell
|
- Use rigid material to construct a weapon frame.
- Usesteel to construct a light switch.
- Attach light switch to the weapon frame.
- Attach rods.
- Welding tool to secure rods.
- Attach cable coil.
- Attachplastic sheets.
- Attach cable coil.
- Screwdriver the assembly to finish.
- Insert powercell in order to power the crossbow.Takes metal rods as ammunition.
|
|
|
Rail Assembly
|
- 2x Rods
- Cable Coil
|
- Use the cable coil to create cable cuffs.
- Click the cable cuffs with the rod.
- Attach the second rod to finish.Used in the construction of other makeshift weaponry.
|

|
Rapid Crossbow Device
|
|
- Use screwdriver on the rapid construction device.
- Attach rapid construction device to the powered crossbow.Like a crossbow, but with technology! Takes compressed matter cartridges as ammo.
|

|
Stunprod
|
- 1x Rod
- Cable Coil
- Wirecutters
- Device Cell
|
- Use the cable coil to create cable cuffs.
- Click the cable cuffs with the rod.
- Attach the wirecutters.
- Insert the device cell to provide the stunprod with a power source.
|

|
Zipgun
|
- 5x Any Rigid Material (Metal, Wood, etc.)
- Pipe (from Pipe Dispenser) OR Makeshift Barrel
- Tape (Duct Tape, Department Tape) OR Cable Coil
- 1xSteel
- Screwdriver
|
- Use rigid material to construct a weapon frame.
- Attach pipe or makeshift barrel.
- Use duct tape or cable coil on the frame to secure the assembly.
- Usesteel to construct a light switch.
- Attach light switch to the weapon frame.
- Screwdriver the assembly to finish.Takes a random type of round (determined at construction) as ammunition.
|
Прокладка проводов
Wiring 101: Or I want to lay cable on the floor.
Step 1. Wear your insulated gloves. Not wearing gloves may result in horrible electrical injury.
Step 2. Acquire your cable coil. To help you confirm if your cable is properly hooked up, also bring a Multitool.
Step 3. Make your cable coil the same colour as the cable you wish to connect it to. To do this, hold your Multitool in one hand and your cable coil in the other, then click on your cable coil with your multitool hand selected. Pick the colour you desire from the list.
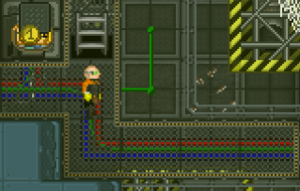
Now we begin cable placement. Cable placement works by moving the cable toward your character from the position you are facing from one tile away.
For example, here is our wiring hero about to place down some cable:
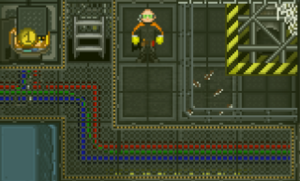
Note that the wiring hero is facing the desired tile. Now. When the tile is clicked from this position:
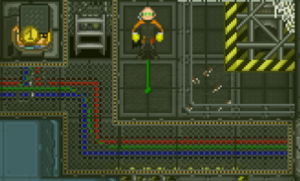
The wiring has been laid down, and is ready to be expanded upon.
If this cable is clicked again, without moving, it will extend the line of cable onto the tile you are standing, as shown here:
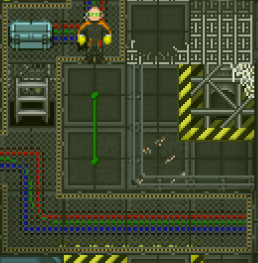
Now, that's how you do a straight line with a cable, but let's say you want to make a nice, neat turn. The way to corner your cable is by standing on the tile you wish to turn your line of cable towards and then click on the cable you laid down previously. If you do this, your cable line will make a smooth, knot-less turn toward where you stand, like so:
Now, if you instead click on the tile itself, you will instead place a second straight line cable down. As seen here:
Now that we have learnt how to place and make our cable look nice, we can hook it up to some other electrical cabling. We can then confirm our cable has power by clicking on the cable with our multi tool. If your newly hooked up cable is hooked up properly to a live cable network that is receiving power, you will receive the following message: "The power cable has 3450 kW flowing through it." - Note, the number will be different based on current grid power. It will otherwise say: "The power cable is not powered." This can help you troubleshoot power issues.
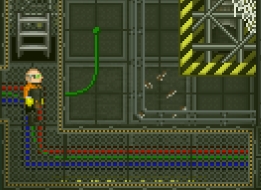
Now we've mastered the basics of wiring, it's time to fix a serious problem: Multi-deck wiring. Let's say some untrustworthy fellow has destroyed your power line going to the engine output SMES. You'll now want to hook up a connection going back to the engineering deck so you can get the precious power flowing again. To do this, find an open space, like so, and face it. Make sure to remove any lattice or other covering before trying to place your wire down or it won't work.
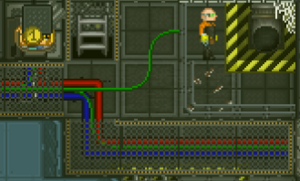
Now, with wire in hand, click on the open space. You can then click on the newly placed cable in the open space to expand the wire over to your non-open space tile. Your end result should, hopefully, be as shown in the next picture.
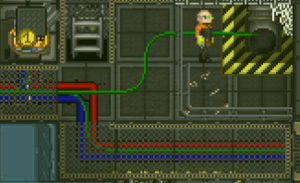
You can then go and verify your multi-deck cabling is in place by heading down to the deck below, exactly where you placed down your upper cable. As we can see, the new connection on the lower deck is in place, ready to be hooked up to the wire network there.
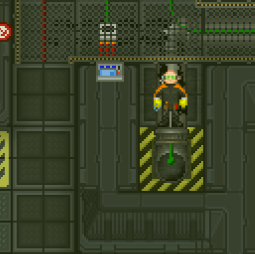
And just like that, you are ready to move power across multiple Z-levels/Decks.


