Этой странице требуется перевод
Эта статья содержит непереведенную информацию.
The user interface allows you to interact with items in your inventory, change how you interact with items and other players, and to quickly gauge your character's status.
Diagram
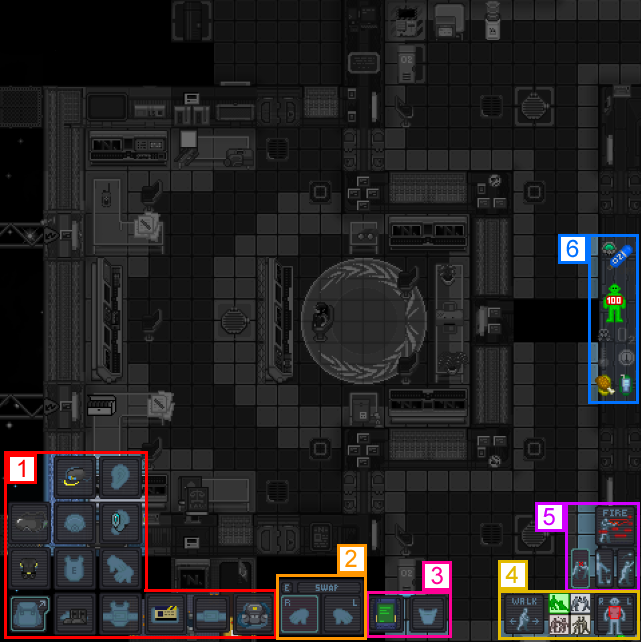
An example of the user interface.
- The inventory cluster, bordered in red, contains items equipped to your character. You can collapse this panel by clicking the backpack icon at the lower left.
- The hands panel, bordered in orange, shows which items you are currently holding.
- The E button allows you to equip the held item to your inventory, if the slot is free.
- The SWAP button allows you to change your active hand.
- The pockets panel, bordered in magenta, shows items which are held in your jumpsuit or uniform's pockets.
- This panel, bordered in yellow, allows you to change how you interact with objects and other players.
- Clicking the RUN button will toggle your movement speed.
- The four buttons (with green, HELP, activated in the example) allow you to change your 'intent'. Refer to the Guide to Combat for detailed explanations of the various intent modes.
- The picture of the man allows you to select which body part of your target you will interact with. For example, you could use this to target their head to apply bandages, or target their leg to kick them in the shin.
- The control cluster, bordered in purple, provides clickable buttons for frequently used actions.
- The topmost button, FIRE, changes how you interact with ranged weapons such as firearms. Refer to the Guide to Combat for detailed explanations of this function.
- The leftmost button, RESIST, allows you to resist bad things happening. This can help with attempting to escape from a grab or restraints.
- The middle button, DROP, drops the item in your active hand to the ground.
- The rightmost button, THROW, enters throwing mode. Click this button and then click anywhere in the game world, and your character will attempt to toss the item in your active hand to that location.
- The status cluster, bordered in blue, provides you with some rough information on the health of your character. Note that not all status images explained in the table below are displayed in the example image. Also, by default, most status indicators are greyed out — this indicates that the warning they represent is not currently active.
Status Indicators
| Status
|
Description
|
| Internals
|
This icon shows whether or not you are currently receiving air from an internal supply, such as an emergency air tank. Clicking this icon serves as a shortcut to toggle any connected air supply.
|
| Pain
|
This icon shows your current pain status for each body part. The color will change from green to red, and finally black, depending on how much pain your character is feeling in that part. Pain does not directly correlate to damage, but it can be used as a rough gauge of your general health.
|
| Hunger
|
This icon shows your character's hunger level. It will display as greyed out when you are not hungry. The icon will change in color from green to yellow to orange to indicate how hungry you are. Hunger impacts a number of things, like how fast you regenerate stamina and lost blood — consider it a reminder to feed your character from time to time.
|
| Thirst
|
This icon shows your character's thirst level. As with hunger, it will display as greyed out when you are not thirsty and will change in color from green to yellow to orange to indicate how thirsty you are. Thirst impacts a number of things, like how fast you regenerate stamina. Thirst can be replenished by drinking water or other liquids.
|
| Fire
|
This is an indicator that your character is on fire. You can extinguish a fire by using a fire extinguisher, or by using the RESIST button to stop, drop, and roll.
|
| Low Oxygen
|
This is a warning that the air you are breathing does not contain sufficient oxygen.
|
| Toxins
|
This is a warning that the air you are breathing contains toxins — usually, chlorine or phoron.
|
| Pressure
|
This is a warning that the atmosphere your character is in is either too high (red pressure indicator), or too low (blue pressure indicator).
|
| Temperature
|
This is a warning that the atmosphere your character in is either too hot, or too cold. The icon changes to indicate the severity of the temperature.
|
Byond Interface – Tabs
There are a number of tabs available to you. They are visible on the top right side of the screen, just above the chat box.
There may be more options, but it depends on your role or objects you have in your hand.
| Tab
|
Options
|
| Status
|
- Local Date: The in-character date.
- Round Duration: How long the round has been going on. There is usually a vote at 03:00 whether the players want to continue the round or not.
- Intent: Shows your current intent.
- Move Mode: Whether you are running or walking.
|
| Preferences
|
|
| Examine
|
- If you shift-click (or right click and select Examine) something, the same text will appear as it appears in your chat window. It gets saved until you examine something again.
|
| Admin
|
- Adminhelp: Sends a private message to every online and offline admin.
- Staffwho: Displays the currently online staff members.
- View Tickets: Every message opens a ticket, this is where you communicate with admins. At the end of the conversation, the admin will close your ticket.
|
| IC
|
- Add Note: Adds an in-game note, only visible to you. Click on "Notes" (same tab) to see your notes.
- Check Default Language: If your character knows more than one language, you can see here what they will use. "Your current default language is your species or mob type default" means that your character will use Galactic Common.
- Check Known Languages: Displays which languages can you speak and what is their hotkey. For example, if your character can speak Sol Common, you can write
say ",1 Hello!" or if you use the hotkey mode, press ENTER and write ,1 Hello! to say hello in Sol Common.
- Check Species Information: It brings up the information panel about your current species.
- Examine: Brings up a list of all the objects you can see. Selecting someone will give you information about that object.
- Face Direction: Makes your character always face that particular direction.
- Give: If you stand next to someone and you have something in your active hand, you can hand it to the other person. They can choose whether they accept it or not.
- Join Response Team: When you are a Ghost, sometimes admins spawn an Emergency Response Team. If the prompt comes up, click this button to apply for it. Absolutely not recommended for new players.
- Join as Actor: Spawns you as an actor into an enclosed, separated area that players can only see through a camera. They are mostly ignored but they can test some items there. Server rules still apply, do not grief there!
- Look up: Checks if you have anything above you - a ceiling or a hole.
- Me: The command for writing an emote, also accessible by pressing
F4 or by pressing 5 in hotkey mode.
- Move Down: When you are observing, you can move down a z-level (a floor) with this verb.
- Move Upwards: Same as above but the other way.
- Notes: Your in-game notes that contain your account number, pin, and funds. You can manage your bank account by inserting your identification card (ID) into an ATM. You can also find your e-mail address and password in your notes. Your PDA (found in your left pocket) has an e-mail software on it!
- Pray: Sends a prayer to a god... But to which god, that is a mystery. This is effectively an in-character-to-admins message. It is advised to use it rarely if ever.
- Pull Punches: Whether you are trying to kill people on Kill intent (red) or just downing them. It is recommended to pull your punches by default.
- Resist: When you are grabbed and want to break out of their grasp, on fire, elbow deep in quicksand, or just in general try to break free from something, use this verb.
- Rest: Makes your character lie down or get up.
- Say: The basic talk verb, also accessible by pressing
F3 or, in hotkey mode, by pressing T or ENTER.
- Set Default Language: If you know more than one language, you can select which one you want to speak all the time. If you wanted to talk in Sol Common for a while and you are tired of writing
,1, set it here and you can omit its key.
- Sleep: Puts your character to sleep for 20 seconds. You cannot hear, move or see during this time.
- Stop Pulling: If you are pulling something with
CTRL + LEFT-CLICK or by right-clicking an item and selecting Pull, you can stop pulling it with this verb. A small dragging icon above your intents do the same.
- Tie Hair: If your hair is long enough, you can change your hairstyle here.
- Toggle Gun Mode: Toggles between Normal and Aimed fire. See the Gun System for more information.
- Whisper: If you whisper, only people adjacent to you will hear your words (everyone else gets an obfuscated message). You can also whisper by typing
say ":w Hello!" or in hotkey mode, by pressing ENTER and typing :w Hello!.
|
| OOC
|
- Cancel Camera View: If you are looking through a camera, use this to exit it.
- Change UI: Changes your User Interface's colour.
- Changelog: Displays the server's latest updates.
- Character Setup: Opens the Character Setup page. You cannot edit the character you are currently playing as.
- Check Round Info: Displays the current roundtype and a short explanation (unless it is "secret").
- Custom Event Info: If the admins are running a custom event (and don't forget to set this), you can find a description of it here.
- Ghost: Removes you from the round. IMPORTANT: Avoid ghosting in the middle of the hallway! Try to get to a Cryogenic Storage (found on both Deck 1 and Deck 3), the area where you started and enter a cryogenic freezer first. Once you are in, you are free to Ghost.
- Hotkeys Help: Displays all the available hotkeys.
- Ignore: If you ignore a user, you will not see their messages in OOC or in deadchat.
- LOOC: Sends a message to the "local out of character chat", visible for everyone around you. Read more about LOOC here.
- OOC: Same as LOOC but server-wide. OOC should never be used for asking questions about in-round events!
- Show Server Revision: A tool for players for when they want to report a bug.
- Spin View CCW: Spins your view counter-clockwise. Occasionally makes things look weird.
- Spin View CW: Same as above but clockwise.
- Toggle Preference: Opens the same list of the one in your Preferences tab.
- Toggle hotkey buttons: Toggles the visibility of the small hotkeys above your intents.
- Unignore: Removes the specified user from your ignore list.
- Vote: If there is a vote, you can participate in it there.
- Who: Displays who is online.
|
| Object
|
- Activate Held Object: If the object in your hand can be activated, this will activate it. In hotkey mode,
Z/Y does the same.
- Check pulse: After a short delay, it checks your pulse.
- Climb: You can climb onto several objects such as low walls and tables.
- Forced Shutdown: A verb for synthetics, does exactly what it says.
- Point To: Points to the object you select. Alternatively, you can
RIGHT-CLICK something and select Point To.
- Pull: Starts pulling the selected item. Alternatively, you can
CTRL + LEFT-CLICK something to start pulling it or select Pull after right-clicking it.
- Read ID Card: Reads your own identification card, containing your blood type, DNA and fingerprint hashes.
- Remove Pen: Removes the pen from your PDA. Click on your PDA to insert it again.
- Remove Underwear: Removes your underwear for... Whatever reason you want to.
- Roll Down Jumpsuit: Rolls your suit down to your waist.
- Roll Up Sleeves: Rolls your sleeves up to your elbows.
- Show Held Item: Displays a small message for everyone around you with the item in your active hand. They can click the message to examine your item.
- Toggle Suit Sensors: Toggles your suit sensors. Strongly suggested to maximize it (set it to Tracking beacon) as soon as you spawn in. The Infirmary monitors the crew with them and if you get injured, it will tell them where you are.
|

