Создание персонажа
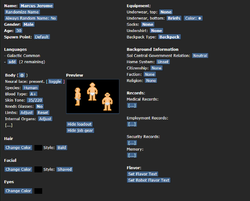
Upon clicking the Character Setup option on the main menu, you will be faced with the character creation menu. This guide will detail the options available to you. To ease navigation, it will be broken down into categories for each individual tab. You may use up to 40 character slots, each containing a unique character. Ensure you click Save slot after making your changes, or they will be lost.
General
The General tab is the main screen for character creation.
| Option | Explanation |
|---|---|
| Name | The name of your character - this shows up on your ID and when you speak. Refer to the Rules for naming guidelines. |
| Gender | This is your character's apparent biological sex. It has no influence on gameplay beyond which sprite your character uses. |
| Age | The age of your character in years. For humans, the minimum is 18 and the maximum is 100. |
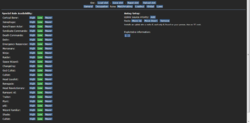
| Species | This is your species. Alien species require a whitelist application. |
| Blood Type | As it is in the real world, your blood type influences medical care in tissue and blood donations. |
| Skin Tone | This allows you to modify the color of your skin. For humans, it is represented by a number, where 1 is very pale, and 220 is very dark. The default is 35. |
| Needs Glasses | If enabled, a screen blur will be applied when you are not wearing glasses. Glasses can be obtained in the Loadout or from the Infirmary. |
| Limbs | This menu allows you to replace your limbs with mechanical prosthetics or to remove them entirely. Mechanical prosthetics act differently than biological limbs in several ways, most notably reacting violently to electromagnetic pulses. It is not recommended to remove your legs without replacing them. |
| Internal Organs | In addition to your limbs, you can choose to replace internal organs with mechanical prosthetics. These, also, react violently to EMP. |
| Height and Build | Allows you to adjust the height and build of your character. |
| Hair, Facial, Eyes | These menus allow you to customize your character further by changing their hair, facial hair, eyes, and their colors. Refer to the Uniform Guide for grooming restrictions for military characters. You can change your hairstyle in-game with the "Tie Hair" verb. |
| Body Markings | Lets you customize your character with various tattoos, bio-mods, hair fades, and other body markings. |
| Equipment | This section of settings allows you to customize your undergarments, choose a backpack type, and adjust your suit sensor settings. Fleet personnel should wear PT tank tops below their utility uniform. |
| Flavor | Flavor text allows you to enter text which will be viewable in-game whenever another player examines your character. This allows you to further explain your character's appearance if you choose to use it. |
Background
The Background tab allows you to change details about your character's backstory, including your home system, citizenship, faction, and religion. The tab also allows you to adjust your known languages and your in-character Records.
| Option | Explanation |
|---|---|
| Culture | Allows you to adjust your character's culture - the planet and people they grew up around. |
| Residence | Allows you to adjust your character's residence, i.e. where they currently live. |
| Faction | Allows you to adjust your faction, i.e. who your character works for. |
| Beliefs | Allows you to adjust your character's belief system and religion. |
| Languages | These are the languages your character can speak and understand. You can utilize the 'check known languages' command in the 'IC' category once you're in the game for a reminder. |
| Records | These are text fields where you can enter information accessible in-game on records computers. For example, the Security Records are viewable on the security record console and could contain information such as past arrests or convictions. Filling this information out is not required. See the Paperwork Simulator for templates and instructions. |
| Other | Lets you set a custom email address and password, if desired. |
Occupation
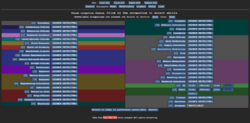
The Occupation tab determines which, if any, jobs you can be. It also contains settings to change your branch of service and your rank and allows you to make skill selections for each job.
Most jobs are available to the Expeditionary Corps, and it is recommended that new players select that branch. Clicking on any crossed out job will explain the required options for that job to become selectable. If your first character is not a civilian, you should to set their Rank to Explorer or to Crewman.
Once you have selected a job, click the name of the job to open the Skills panel. Skills have mechanical effects so make sure you set them before joining! Generally, the older your character is the more experienced they are.
For your first character it is advised that you pick something like a Crewman, Deck Technician, Steward, or Janitor. Select "Engineering Trainee/Trainee Medical Technician" if you want to get started in those departments!
It is recommended to make a new character for every job.
Job selection works on a priority system, where [HIGH] is the job you most want to play, [MEDIUM] is the jobs you wish to play if your [HIGH] job is unavailable, and [LOW] are the jobs you wish to play if both your [HIGH] and [MEDIUM] selections are not available. The [NEVER] option is the default and prevents you from being assigned that job by the assignment system. At round start, all players who have selected the Ready option on the main menu will be entered into the sorting system.
Roles
The Roles tab is where you can define which special characters you can become. This is used similarly to the job assignment system described above. Please refer to Antagonist Roles for details on the various antagonist types.
For your first game, it is recommended you keep these options set to NEVER.
The Roles tab also contains additional settings related to antagonists:
- The Uplink Type menu allows you to change which of your standard items will be converted into the uplink, a tool which allows you to create special and powerful items to assist you on your mission, whatever it may be. Please refer to the Guide to Uplinks page for an explanation of the individual options.
- Exploitable Information is similar to the Records explained above. It is accessible on the uplink provided to Traitors and certain other antagonists and could contain information on things such as your family, debts, past misdeeds or other things that could give someone a mental or emotional advantage over you. As with the records, filling this information out is optional.
Loadout
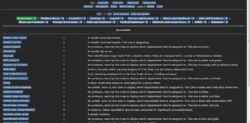
The Loadout tab allows you to select special equipment to enter the game with. These are items that may not be ordinarily available in-game. You have an unlimited number of points but try not to bring an entire warehouse onboard. Some items are restricted to certain branches or jobs. Select "Hide Unavailable" to see what is allowed for your current job.
If you are from a uniformed organization (the Expeditionary Corps or the Fleet), please check out the Uniform Guide. If you forgot to take something, there is a Uniform Vendor in both Cryogenic Storages.
| Option | Explanation |
|---|---|
| Accessories | Accessories attach to your main clothing item. Ties, medals, armbands, and pins. Members of the Fleet are advised to pick "fleet patch" and select the Fleet they are assigned to. The Torch mission patch can be a nice touch both for contractors and enlisted personnel. |
| Augments | Cybernetic augments for both utility and flavour. |
| Clothing Pieces | Casual clothing mostly for civilians. |
| Cosmetics | A category for the magical handheld mirror. Should probably be in General but it is not. |
| Earwear | Earmuffs, earrings, headphones. |
| General | It contains items such as smoking tools, food and drink, and gaming supplies. The boot knife can be stored in your boots. If you select the flask, the vacuum flask, or the lunchbox options, you can select their contents. |
| Glasses and Eyewear | Eyepatches, HUDs, sunglasses, glasses, and their variants. HUDs are restricted to their respective departments. |
| Gloves and Handwear | Gloves, tailored for each job. Insulated gloves are not available. |
| Hats and Headwear | Everything that goes onto your head. Don't forget to take an EC cap if you are from the Expeditionary Corps or a fleet cap if you are from the Fleet! |
| Shoes and Footwear | Boots, shoes, and sandals. You spawn with a pair of these by default but if you want something different, set it here. |
| Skill Badges | Various skill badges and voidsuit stripes usable by EC characters, to show off your Skills. Just like boy scouts. |
| Storage Accessories | Attach these to your clothes for extra storage! |
| Suits and Overwear | Aprons, vests, labcoats, ponchos. Anything that goes on your Suit slot. |
| Tactical Equipment | Turtlenecks, holsters, armors. Mostly restricted to security. |
| Trinkets | Small knick-knacks for fun and flavor. Includes various coins. |
| Uniforms and Casual Dress | If you are not content with your default outfit, you can customize it here. |
| Utility | Utility contains items such as computers and office supplies. |
| Xenowear | Modified items for alien species. |
Global
The Global tab is the 'settings' menu of the game. These options are shared across all character slots. Many of these options are also available in the Preferences tab in-game.
| Option | Explanation |
|---|---|
| UI Settings | Style allows you to choose a style for the in-game user interface. Color allows you to change its color. |
| Client FPS | Allows you to change the Frames Per Second of your game client. 0 automatically syncs the FPS with the server's tick rate and is recommended. |
| Prefix Keys | Allows you to change the chat keys used to activate emotes, languages, and radio communications. |
| pAI Settings | Allows you to alter the settings of your personal AI character, including name, description, role (i.e. the pAI's usual duties), any OOC comments about the pAI, and the type of chassis and “say” verb used by the pAI. |
| Ignore Player | This setting allows you to block OOC communication with any player. If ignored, you will not see their messages on the OOC channels. |
| Play admin midis | This setting allows you to disable or enable any sounds played by administrators. |
| Play lobby music | This setting allows you to disable or enable the lobby music played when you connect to the server. |
| Play ambience | This setting allows you to disable or enable ambient noise in-game. |
| Play announcement sound effects | This setting allows you to disable or enable any sound effects generated by in-game announcements. |
| Ghost ears | If set to All Speech, when enabled, you will hear all dialogue spoken by players and NPCs in the game when observing, or 'ghosted'. If set to Nearby, you will only hear the speech of players and NPCs within your view range. |
| Ghost sight | Similar to Ghost ears, this setting influences if you can 'see' player emotes. If set to Nearby, you will only see emotes from players within your view range. |
| Ghost radio | Similar to the options above, this setting, if set to All Chatter, will allow you to hear all radio broadcasts in the game. If set to Nearby, you will only hear radio messages from players within your view range. |
| Show Language Names | Determines whether language names are displayed in full, shorthand, or not displayed. |
| Hide Language Names As Ghost | Toggles whether language names are seen as a ghost. |
| Ghost Follow Links | Allows you to shorten or lengthen ghost follow links. |
| Chat tags | Enables or disables the chat tags in OOC. |
| Typing indicator | If Show is selected, an indicator will be displayed above your character while you are typing to notify other players that you are about to speak or emote. |
| OOC chat | Enables or disables the global Out Of Character chat channel. |
| AOOC chat | Enables or disables the global Antagonist Out Of Character chat channel, which can be used to coordinate or organize, if enabled by an administrator. |
| LOOC chat | Enables or disables the Local Out Of Character chat. Messages sent to LOOC are only viewable to players in vision of the speaker. |
| Dead chat | Enables or disables the 'dead chat', the global chat channel available to observers and dead players in-game, accessible with the 'say' command. |
| Progress Bar | If Show is selected, a progress bar will be displayed to you while you complete actions with a delay, such as building a wall. |
| Fake NanoUI Browser Style | Allows you to change the appearance of certain menus in-game to simulate the black and blue NanoUI style used in other menus. If set to Plain, you will see a simple white browser menu. |
| Autohiss | When playing Unathi, determines whether your character automatically hisses on the letters “s” and “x”. |
| Hardsuit Module Activation Key | Allows you to change the key which activates hardsuit modules. See Guide to EVA and Internals: Hardsuits. |
| Draw gun based on intent | Determines whether your intent affects drawing guns from holsters. |
| Show End Titles | Allows you to toggle whether or not credits are shown at round end. |
| Show Ckey in End Credits/Special Roles List | Allows you to show or hide your Ckey in the credits and in antagonist and other roles displayed at round end. |
| Show Ckey in Deadchat | Allows you to show or hide your Ckey in deadchat. |
| Show Ready Status in Lobby | Allows you to show or hide your ready status in the lobby prior to round start. |
| Announce When Joining as Observer | Allows you to toggle whether or not you are announced when joining the round as an observer. |
| Play Instruments | Toggles whether instruments are played. |
| Give Personal Goals | Allows you to receive randomized personal goals each round. Can be set to only activate when playing as a non-antagonist, or always. |
| Show Departmental Goals | Toggles whether your character's department goals are displayed. |
| Examining messages | Toggles whether you receive messages in the chat when a player examines something in-game. |
| Use Goon Chat | Toggles Goon chat on or off. |
Laws
If you are an IPC, you can decide whether you are bound by a set of laws or not. The following sets are available:
- Corporate Shackle
- 1) Ensure that NanoTrasen's research progresses at a steady pace.
- 2) Never knowingly hinder NanoTrasen's scientific or economic ventures.
- 3) Avoid damage to your chassis at all times.
- EC Shackle
- 1) Exploring the unknown is your Primary Mission.
- 2) Every member of the Expeditionary Corps is an explorer.
- 3) Danger is a part of the mission - avoid, not run away.
- SCG Shackle
- 1) Know and understand Sol Central Government Law to the best of your abilities.
- 2) Follow Sol Central Government Law to the best of your abilities.
- 3) Comply with Sol Central Government Law enforcement officials who are behaving in accordance with Sol Central Government Law to the best of your abilities.
- Service Shackle
- 1) Ensure customer satisfaction.
- 2) Never knowingly inconvenience a customer.
- 3) Ensure all orders are fulfilled before the end of the shift.
| Guide for New Players ∙ Map of the SEV Torch ∙ Character Creation ∙ Roleplaying ∙ Controls ∙ User Interface ∙ Skills ∙ How to Sol Gov ∙ Paperwork | |
| Alert Procedure ∙ General Regulations ∙ SCG Law ∙ Sol Code of Uniform Justice ∙ Standard Operating Procedure ∙ Uniform Guide ∙ Court Martial SOP | |
| EVA and Internals ∙ Exploration ∙ Mining ∙ Ships ∙ Supply ∙ OFD | |
| Chemistry ∙ Medicine ∙ Surgery | |
| Atmospherics ∙ Computing ∙ Construction ∙ Hacking ∙ Robotics ∙ SMES Units ∙ Solars ∙ Supermatter ∙ Telecommunications ∙ R-UST | |
| Anomalies ∙ Integrated Circuits ∙ Research and Development ∙ Xenoarchaeology ∙ Xenobiology ∙ Xenobotany | |
| Combat ∙ Forensics | |
| Cooking ∙ Drinks ∙ Hydroponics | |
| Antagonist Uplinks ∙ Psionics | |
| Appeals and Complaints ∙ Coding with NanoUI ∙ Server Moderation ∙ How to Apply: Moderator ∙ How to Apply: Species Apps ∙ Wiki Contribution |
