Создание персонажа
Нажав кнопку Setup на экране лобби, вы откроете меню создания персонажа. В этом руководстве будет раскрыт функционал каждой вкладки данного меню. В вашем распоряжении 10 слотов, в которых вы можете сохранять своих персонажей. Не забывайте сохранять слот персонажа (Save slot), иначе ваши изменения будут утеряны.
Physical
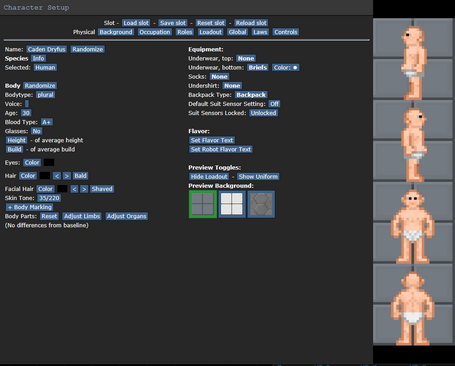
Вкладка Physical предоставляет возможность настройки параметров внешнего вида вашего персонажа.
Уже сразу вы можете заметить экран предпросмотра с правой стороны, позволяющий вам понаблюдать, как будет выглядеть ваш будущий персонаж. Этот экран будет на каждой вкладке.
| Параметр | Назначение |
|---|---|
| Имя
Name |
Имя вашего персонажа, которое будет отображаться на вашей идентификационной карте в логе чата при разговоре и действиях. Имя должно соответствовать правилам сервера. |
| Пол
Gender |
Биологический пол вашего персонажа. Не предоставляет различий для геймплея, кроме используемого спрайта вашего персонажа. |
| Возраст
Age |
Возраст вашего персонажа в годах. Для людей минимально допустимый возраст - 18 лет, максимальный - 100 лет. |
| Вид
Species |
Биологический вид, или раса вашего персонажа. |
| Группа крови
Blood Type |
Позволяет выбрать группу крови вашего персонажа, что влияет на геймплей.
В игре реализована механика совместимости групп крови при переливании, в частности - механика гемолитической реакции (отторжение несовместимой крови). |
| Тон кожи
Skin Tone |
Позволяет настроить тон кожи вашего персонажа.
1 - самый бледный тон, 220 - самый темный. По стандарту выставлено на 35. |
| Близорукость
Glasses |
Если включено, ваш персонаж будет страдать близорукостью, - зрение будет размытым.
Вы можете получить коррекционные очки в меню выкладки или попросить у медиков в лазарете. |
| Конечности
Limbs |
Позволяет выбирать конечности для вашего персонажа, будь они протезированными или ампутированными.
Механические протезы существенно отличаются от биологических конечностей, - в частности, они весьма уязвимы к воздействию ЭМИ. |
| Органы
Internal Organs |
Вдобавок к конечностям, вы можете выбирать конкретные внутренние органы. Которые также будут уязвимы к ЭМИ. |
| Рост и телосложение
Height and Build |
Позволяет настроить рост и телосложение персонажа. Выражается не численно, а только пятью отдельными описаниями. |
| Волосы, лицевая растительность, глаза
Hair, Facial, Eyes |
В этих меню вы можете настроить свою прическу и лицевую растительность, а также изменить их цвет и цвет глаз. |
| Нательные метки
Body Markings |
Позволяет кастомизировать персонажа татуировками, шрамами, биомодами и т.д. |
| Экипировка
Equipment |
Позволяет выбрать нательное белье и отдельный вид рюкзака для персонажа. |
| Описание
Flavor |
Флавор-текст позволяет настроить подробное визуальное описание для вашего персонажа, когда кто-нибудь захочет осмотреть его в игре. |
Background
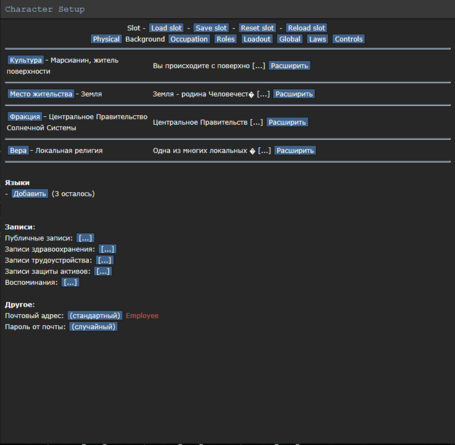
Вкладка Background позволяет вам прописать предысторию вашего персонажа - его происхождение, культуру и вероисповедание, выученные языки и досье.
| Параметр | Назначение |
|---|---|
| Культура
Culture |
Происхождение вашего персонажа, т.е. где он родился и вырос. |
| Место проживания
Residence |
Текущее место проживания/прописки вашего персонажа. |
| Фракция
Faction |
Принадлежность вашего персонажа, т.е. на кого он работает. |
| Вера
Beliefs |
Вероисповедание вашего персонажа. |
| Языки
Languages |
Изученные вашим персонажем языки, на которых он может общаться.
Во вкладке IC главного экрана игры вы можете кликнуть Check Known Languages, чтобы пересмотреть, какие языки знает ваш персонаж. |
| Записи
Records |
Досье на вашего персонажа: публичные записи, медицинская карточка, трудовая книжка и сведения для службы безопасности.
Вы можете воспользоваться Paperwork Simulator, чтобы изучить шаблоны и инструкции к заполнению. Заполнение записей опционально |
| Другое
Other |
Позволяет настроить желаемый адрес электронной почты и пароль от нее. |
Occupation
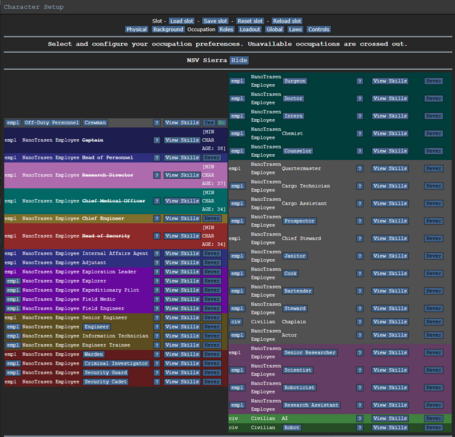
Вкладка Occupation позволяет вам настроить должности, на которых вы бы хотели поиграть, в частности - настроить набор навыков и выбрать шанс появления на конкретной желаемой должности, а также выбрать ее наименование.
В инжерном, медицинском, научно-исследовательском отделах и службе безопасности существуют стажерские должности. Советуем выбирать именно их, если вы только ознакамливаетесь с работой. Если вы желаете изучить карту, лучше выберите роль пассажира.
После выбора желаемой должности, нажмите View Skills для настройки набора навыков под нее. Навыки непосредственно влияют на полноценность геймплея, так что не пренебрегайте ими.
Также рекомендуем создать отдельных персонажей для каждой желаемой должности.
В игре существует система ростера персонажей, то есть, на какие должности будут определены персонажи игроков после начала раунда в зависимости от приоритета шанса появления на конкретной должности, с тем условием, если игроки объявили готовность к началу раунда, то есть, нажали кнопку Ready. Напротив каждой должности находится кнопка, которая имеет четыре настройки приоритета: High, Medium, Low и Never.
- High обозначает высокий приоритет должности, на которой вы хотели бы появиться в начале раунда;
- Medium обозначает средний приоритет, - на этой должности вы появитесь, если вакансии с высоким приоритетом оказались недоступны;
- Low обозначает низкий приоритет, - для тех случаев, если должности с высоким и средним приоритетом недоступны;
- Never обозначает, что вы никогда не появитесь на должности с данной настройкой.
Могут быть случаи, когда все ваши желаемые должности оказались недоступны, и при запуске раунда вы останетесь в лобби, или же вы можете просто не успеть зайти к началу раунда. Не отчаивайтесь - вы можете просто нажать кнопку Join и выбрать любую должность из всего списка.
Roles
- The Uplink Type menu allows you to change which of your standard items will be converted into the uplink, a tool which allows you to create special and powerful items to assist you on your mission, whatever it may be. Please refer to the Guide to Uplinks page for an explanation of the individual options.
- Exploitable Information is similar to the Records explained above. It is accessible on the uplink provided to Traitors and certain other antagonists and could contain information on things such as your family, debts, past misdeeds or other things that could give someone a mental or emotional advantage over you. As with the records, filling this information out is optional.
Roles
The Roles tab is where you can define which special characters you can become. This is used similarly to the job assignment system described above. Please refer to Antagonist Roles for details on the various antagonist types.For your first game, it is recommended you keep these options set to NEVER.
The Roles tab also contains additional settings related to antagonists:
- The Uplink Type menu allows you to change which of your standard items will be converted into the uplink, a tool which allows you to create special and powerful items to assist you on your mission, whatever it may be. Please refer to the Guide to Uplinks page for an explanation of the individual options.
- Exploitable Information is similar to the Records explained above. It is accessible on the uplink provided to Traitors and certain other antagonists and could contain information on things such as your family, debts, past misdeeds or other things that could give someone a mental or emotional advantage over you. As|}
Occupation
Вкладка Occupation позволяет вам настроить должности, на которых вы бы хотели поиграть, в частности - настроить набор навыков и выбрать шанс появления на конкретной желаемой должности, а также выбрать ее наименование.
В инжерном, медицинском, научно-исследовательском отделах и службе безопасности существуют стажерские должности. Советуем выбирать именно их, если вы только ознакамливаетесь с работой. Если вы желаете изучить карту, лучше выберите роль пассажира.
После выбора желаемой должности, нажмите View Skills для настройки набора навыков под нее. Навыки непосредственно влияют на полноценность геймплея, так что не пренебрегайте ими.
Также рекомендуем создать отдельных персонажей для каждой желаемой должности.
В игре существует система ростера персонажей, то есть, на какие должности будут определены персонажи игроков после начала раунда в зависимости от приоритета шанса появления на конкретной должности, с тем условием, если игроки объявили готовность к началу раунда, то есть, нажали кнопку Ready. Напротив каждой должности находится кнопка, которая имеет четыре настройки приоритета: High, Medium, Low и Never.
- High обозначает высокий приоритет должности, на которой вы хотели бы появиться в начале раунда;
- Medium обозначает средний приоритет, - на этой должности вы появитесь, если вакансии с высоким приоритетом оказались недоступны;
- Low обозначает низкий приоритет, - для тех случаев, если должности с высоким и средним приоритетом недоступны;
- Never обозначает, что вы никогда не появитесь на должности с данной настройкой.
Могут быть случаи, когда все ваши желаемые должности оказались недоступны, и при запуске раунда вы останетесь в лобби, или же вы можете просто не успеть зайти к началу раунда. Не отчаивайтесь - вы можете просто нажать кнопку Join и выбрать любую должность из всего списка.
Roles
The Roles tab is where you can define which special characters you can become. This is used similarly to the job assignment system described above. Please refer to Antagonist Roles for details on the various antagonist types.For your first game, it is recommended you keep these options set to NEVER.
The Roles tab also contains additional settings related to antagonists:
- The Uplink Type menu allows you to change which of your standard items will be converted into the uplink, a tool which allows you to create special and powerful items to assist you on your mission, whatever it may be. Please refer to the Guide to Uplinks page for an explanation of the individual options.
- Exploitable Information is similar to the Records explained above. It is accessible on the uplink provided to Traitors and certain other antagonists and could contain information on things such as your family, debts, past misdeeds or other things that could give someone a mental or emotional advantage over you. As with the records, filling this information out is optional.
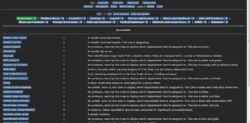
Loadout
The Loadout tab allows you to select special equipment to enter the game with. These are items that may not be ordinarily available in-game. You have an unlimited number of points but try not to bring an entire warehouse onboard. Some items are restricted to certain branches or jobs. Select "Hide Unavailable" to see what is allowed for your current job.If you are from a uniformed organization (the Expeditionary Corps or the Fleet), please check out the Uniform Guide. If you forgot to take something, there is a Uniform Vendor in both Cryogenic Storages.
| Option | Explanation |
|---|---|
| Accessories | Accessories attach to your main clothing item. Ties, medals, armbands, and pins. Members of the Fleet are advised to pick "fleet patch" and select the Fleet they are assigned to. The Torch mission patch can be a nice touch both for contractors and enlisted personnel. |
| Augments | Cybernetic augments for both utility and flavour. |
| Clothing Pieces | Casual clothing mostly for civilians. |
| Cosmetics | A category for the magical handheld mirror. Should probably be in General but it is not. |
| Earwear | Earmuffs, earrings, headphones. |
| General | It contains items such as smoking tools, food and drink, and gaming supplies. The boot knife can be stored in your boots. If you select the flask, the vacuum flask, or the lunchbox options, you can select their contents. |
| Glasses and Eyewear | Eyepatches, HUDs, sunglasses, glasses, and their variants. HUDs are restricted to their respective departments. |
| Gloves and Handwear | Gloves, tailored for each job. Insulated gloves are not available. |
| Hats and Headwear | Everything that goes onto your head. Don't forget to take an EC cap if you are from the Expeditionary Corps or a fleet cap if you are from the Fleet! |
| Shoes and Footwear | Boots, shoes, and sandals. You spawn with a pair of these by default but if you want something different, set it here. |
| Skill Badges | Various skill badges and voidsuit stripes usable by EC characters, to show off your Skills. Just like boy scouts. |
| Storage Accessories | Attach these to your clothes for extra storage! |
| Suits and Overwear | Aprons, vests, labcoats, ponchos. Anything that goes on your Suit slot. |
| Tactical Equipment | Turtlenecks, holsters, armors. Mostly restricted to security. |
| Trinkets | Small knick-knacks for fun and flavor. Includes various coins. |
| Uniforms and Casual Dress | If you are not content with your default outfit, you can customize it here. |
| Utility | Utility contains items such as computers and office supplies. |
| Xenowear | Modified items for alien species. |
Global
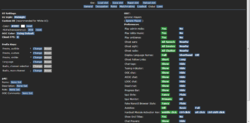
The Global tab is the 'settings' menu of the game. These options are shared across all character slots. Many of these options are also available in the Preferences tab in-game.
| Option | Explanation |
|---|---|
| UI Settings | Style allows you to choose a style for the in-game user interface. Color allows you to change its color. |
| Client FPS | Allows you to change the Frames Per Second of your game client. 0 automatically syncs the FPS with the server's tick rate and is recommended. |
| Prefix Keys | Allows you to change the chat keys used to activate emotes, languages, and radio communications. |
| pAI Settings | Allows you to alter the settings of your personal AI character, including name, description, role (i.e. the pAI's usual duties), any OOC comments about the pAI, and the type of chassis and “say” verb used by the pAI. |
| Ignore Player | This setting allows you to block OOC communication with any player. If ignored, you will not see their messages on the OOC channels. |
| Play admin midis | This setting allows you to disable or enable any sounds played by administrators. |
| Play lobby music | This setting allows you to disable or enable the lobby music played when you connect to the server. |
| Play ambience | This setting allows you to disable or enable ambient noise in-game. |
| Play announcement sound effects | This setting allows you to disable or enable any sound effects generated by in-game announcements. |
| Ghost ears | If set to All Speech, when enabled, you will hear all dialogue spoken by players and NPCs in the game when observing, or 'ghosted'. If set to Nearby, you will only hear the speech of players and NPCs within your view range. |
| Ghost sight | Similar to Ghost ears, this setting influences if you can 'see' player emotes. If set to Nearby, you will only see emotes from players within your view range. |
| Ghost radio | Similar to the options above, this setting, if set to All Chatter, will allow you to hear all radio broadcasts in the game. If set to Nearby, you will only hear radio messages from players within your view range. |
| Show Language Names | Determines whether language names are displayed in full, shorthand, or not displayed. |
| Hide Language Names As Ghost | Toggles whether language names are seen as a ghost. |
| Ghost Follow Links | Allows you to shorten or lengthen ghost follow links. |
| Chat tags | Enables or disables the chat tags in OOC. |
| Typing indicator | If Show is selected, an indicator will be displayed above your character while you are typing to notify other players that you are about to speak or emote. |
| OOC chat | Enables or disables the global Out Of Character chat channel. |
| AOOC chat | Enables or disables the global Antagonist Out Of Character chat channel, which can be used to coordinate or organize, if enabled by an administrator. |
| LOOC chat | Enables or disables the Local Out Of Character chat. Messages sent to LOOC are only viewable to players in vision of the speaker. |
| Dead chat | Enables or disables the 'dead chat', the global chat channel available to observers and dead players in-game, accessible with the 'say' command. |
| Progress Bar | If Show is selected, a progress bar will be displayed to you while you complete actions with a delay, such as building a wall. |
| Fake NanoUI Browser Style | Allows you to change the appearance of certain menus in-game to simulate the black and blue NanoUI style used in other menus. If set to Plain, you will see a simple white browser menu. |
| Autohiss | When playing Unathi, determines whether your character automatically hisses on the letters “s” and “x”. |
| Hardsuit Module Activation Key | Allows you to change the key which activates hardsuit modules. See Guide to EVA and Internals: Hardsuits. |
| Draw gun based on intent | Determines whether your intent affects drawing guns from holsters. |
| Show End Titles | Allows you to toggle whether or not credits are shown at round end. |
| Show Ckey in End Credits/Special Roles List | Allows you to show or hide your Ckey in the credits and in antagonist and other roles displayed at round end. |
| Show Ckey in Deadchat | Allows you to show or hide your Ckey in deadchat. |
| Show Ready Status in Lobby | Allows you to show or hide your ready status in the lobby prior to round start. |
| Announce When Joining as Observer | Allows you to toggle whether or not you are announced when joining the round as an observer. |
| Play Instruments | Toggles whether instruments are played. |
| Give Personal Goals | Allows you to receive randomized personal goals each round. Can be set to only activate when playing as a non-antagonist, or always. |
| Show Departmental Goals | Toggles whether your character's department goals are displayed. |
| Examining messages | Toggles whether you receive messages in the chat when a player examines something in-game. |
| Use Goon Chat | Toggles Goon chat on or off. |
Laws
If you are an IPC, you can decide whether you are bound by a set of laws or not. The following sets are available:
- Corporate Shackle
- 1) Ensure that NanoTrasen's research progresses at a steady pace.
- 2) Never knowingly hinder NanoTrasen's scientific or economic ventures.
- 3) Avoid damage to your chassis at all times.
- EC Shackle
- 1) Exploring the unknown is your Primary Mission.
- 2) Every member of the Expeditionary Corps is an explorer.
- 3) Danger is a part of the mission - avoid, not run away.
- SCG Shackle
- 1) Know and understand Sol Central Government Law to the best of your abilities.
- 2) Follow Sol Central Government Law to the best of your abilities.
- 3) Comply with Sol Central Government Law enforcement officials who are behaving in accordance with Sol Central Government Law to the best of your abilities.
- Service Shackle
- 1) Ensure customer satisfaction.
- 2) Never knowingly inconvenience a customer.
- 3) Ensure all orders are fulfilled before the end of the shift.
| Guide for New Players ∙ Map of the SEV Torch ∙ Character Creation ∙ Roleplaying ∙ Controls ∙ User Interface ∙ Skills ∙ How to Sol Gov ∙ Paperwork | |
| Alert Procedure ∙ General Regulations ∙ SCG Law ∙ Sol Code of Uniform Justice ∙ Standard Operating Procedure ∙ Uniform Guide ∙ Court Martial SOP | |
| EVA and Internals ∙ Exploration ∙ Mining ∙ Ships ∙ Supply ∙ OFD | |
| Chemistry ∙ Medicine ∙ Surgery | |
| Atmospherics ∙ Computing ∙ Construction ∙ Hacking ∙ Robotics ∙ SMES Units ∙ Solars ∙ Supermatter ∙ Telecommunications ∙ R-UST | |
| Anomalies ∙ Integrated Circuits ∙ Research and Development ∙ Xenoarchaeology ∙ Xenobiology ∙ Xenobotany | |
| Combat ∙ Forensics | |
| Cooking ∙ Drinks ∙ Hydroponics | |
| Antagonist Uplinks ∙ Psionics | |
| Appeals and Complaints ∙ Coding with NanoUI ∙ Server Moderation ∙ How to Apply: Moderator ∙ How to Apply: Species Apps ∙ Wiki Contribution |
